Donation Upload Process
This process allows a User for the entity to upload Donations data using a CSV (Comma Separated Values) file.
Note that cash donations under GASDS (Gift Aid Small Donation Scheme) schemes may not be uploaded using this process
The CSV file must be in the standard CSV format specified below.
Liberty Accounts does reserve the right to charge for any support required following a failure to adhere to the guidelines in this specification.
Ensure that file uploads are activated in the entity profile.
Entity Name - Profile - Optional Features Tab - tick Use File Uploads
The Process in Summary
- Source the information as necessary
- Prepare the CSV file.

- Ensure that file uploads are activated in the entity Profile
- Access the Upload process via the Donors menu.
- Map upload file names to system file names if necessary
- Review the data upload and deal with any potential duplicate records and confirm the upload
This may be done in a TEXT editor
programme such as Notepad (usually supplied with Windows), Textedit (usually supplied with an Apple Mac) or Microsoft Excel (or equivalent).
The key point is that commas separate the data fields and the file has a '.csv' file extension.
If using Microsoft Excel to generate .csv files you are advised to select the full area of the dataset and format the cells as "Text" before saving as a csv file. This will help to ensure that the file is consistently formatted.
File Format
Upload requires that data be presented in a standard csv file. Please follow the points below carefully and ensure that file is properly formatted.
- The order of the fields is not significant but the order of the data fields must match the order of the field names in the first line.
- Where a text field contains a comma the field should be quoted using double quotes - e.g. "office,Products Ltd".
- Numeric fields should NOT include comma formatting of thousands etc.
- Numeric fields may include a decimal point as appropriate.
- Numeric fields may include a - sign as a prefix if negative - e.g. -9999.99
- Date fields must contain 4 digit year and be in the following format: dd/MM/yyyy eg 25/1/2006 if no date format is provided in the import file.
- A date format pattern may be specified on each line of the import file if desired; define a field "date_format" and include a date pattern using the standard date patterns as specified for the java language SimpleDateFormat class.
- If the file is generated from a software package such as your accounting package or a spreadsheet you should review the file using a simple text editor before uploading it to ensure it is properly formatted. PLEASE ENSURE THAT NO SYMBOLS OR TEXT ARE SHOWN AFTER THE LAST DATA LINE
The first line of the file should contain valid field names from the list below. Note the underscore character in place of spaces.
It is not necessary to include every field in your upload file, just include those that are indicated as mandatory and those for which you wish to include data.
Note that where field data exceeds the maximum permitted size it will be truncated.
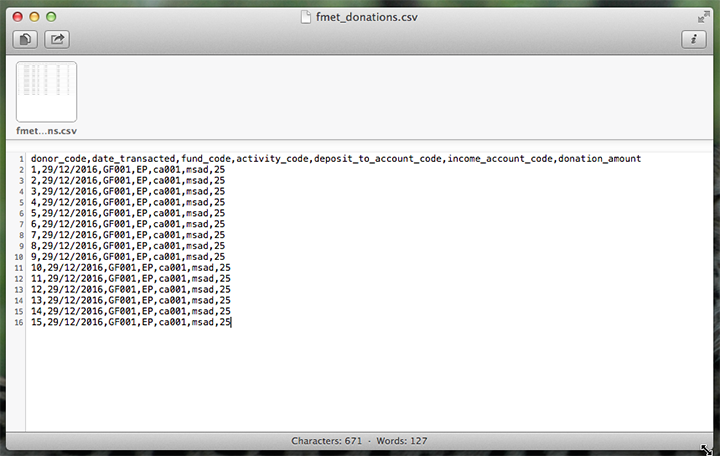
Example of a formatted file
The information necessary is that which would be entered normally when setting up a new donation.
The example of a valid file is shown here. The file was created in a simple text editor program.
Field Names and Descriptions
Required fields are indicated with .
- donor_code
- date_transacted
- fund_code
- activity_code
- deposit_to_account_code
- income_account_code
- donation_amount
- fee_amount
- fee_account_code (required if fee_amount > 0)
- sponsored_event_code
- donation_benefit_value
- reference
- memo
The parameters for each field are described below.
- donor_code (text: max 20 characters) - Required
-
The donation is referenced to a donor via a donor code. The code is previously set on the Donor Maintenance record.
Donors - Donors - EDIT the relevant donor to add a code.
- donor_name (text: max 60 characters) - Required but only needs to be provided for corporate donors
- This field only needs to be provided for corporate donors, otherwise it is constructed using the first, middle and last names in the upload data. If you have no corporate donors in your upload you do not need to include this field.
- date_transacted (date formatted text) - Required
- The date associated with the donation. It may used for gift aid purposes. The default format for the date is: d/m/yyyy e.g. 25/1/2007 If an alternative date format is used the date_format pattern should be included in every line of the import file - see below.
- fund_code (text: max 20 characters) - Required
-
The Fund benefiting from the donation. The code is previously set on the Fund Maintenance record.
Funds - Funds - EDIT the relevant Fund to add a code
- activity_code (text: max 20 characters) - Optional
-
The Activity benefiting from the donation. The code is previously set on the Activity Maintenance record.
Funds - Activities - EDIT the relevant Activity to add a code
- deposit_to_account_code (text: max 20 characters) - Required
-
This field should contain a user defined code for the bank/credit card account to which
you wish to record the receipt. The code may be defined on the account record and
allows users to cross-reference an account in Liberty Accounts with a code
from an external system.
Note if the code is not found on an account during an upload the user will be able to select the account from a mapping screen.
A code is set on the account maintenance record.
Accounts - Relevant Bank Account - Action Menu - Configure the relevant account to add a cross reference code
Use the Cross References tab and enter a suitable code in the Import Cross Reference field.
- income_account_code (text: max 20 characters) - Required
-
This field should contain a user defined code for the income account to which
you wish to record the donation. The code may be defined on the account record and
allows users to cross-reference an account in Liberty Accounts with a code
from an external system.
Note if the code is not found on an account during an upload the user will be able to select the account from a mapping screen.
A code is set on the account maintenance record.
Accounts - Income - Action Menu - Configure the relevant account to add a cross reference code
Use the Cross References tab and enter a suitable code in the Import Cross Reference field.
- donation_amount (numeric) - Required
- The amount of the donation. Numeric values must not include comma formatting.
- fee_amount (numeric) - Optional
- The amount of the donation. Numeric values must not include comma formatting.
- fee_account_code (text: max 20 characters) - Required if fee_amount > 0
-
This field should contain a user defined code for the fee account to which
you wish to record the fee. The code may be defined on the account record and
allows users to cross-reference an account in Liberty Accounts with a code
from an external system.
Note if the code is not found on an account during an upload the user will be able to select the account from a mapping screen.
A code is set on the account maintenance record.
Accounts - Income - EDIT the relevant Account to add a code
- sponsored_event_code (text: max 20 characters) - Optional
-
The sponsored event generating the donation. The event information is used for gift-aid claim purposes.
The code is previously set on a Sponsored Event Maintenance record.
Donors - Sponsored Events - List Events - EDIT the relevant Event to add a code
- donation_benefit_value (numeric) - Optional
- The value of any benefit the donor has received as a result of the donation. The value is used for gift-aid claim purposes. Numeric values must not include comma formatting.
- reference (text: max 25 characters) - Optional
- A free form reference field.
- memo (text: max 25 characters) - Optional
- A free form memo field.
Activate File Uploads
Ensure that file uploads are activated in the entity profile.
Control - Organisation Profile - Optional Features Tab - tick Use File Uploads
Upload Process
Once the CSV creation is complete the upload process is accessed via the Donors menu.
Donors - Donation Upload
The upload process screen is displayed. A technical specification (part of this user guide) is accessed via .
When uploading data using csv files one of two "Upload Modes" must Be selected:
- Delete all prior upload data and add new data :-
- When this mode is selected the application will try to delete all previously uploaded data before adding data from the new file. If previously uploaded data has been edited, or has additional related data that has been added since the upload, the item will not be deleted and will not be replaced by any new data in the upload file.
- Replace any matching prior upload data and add new data :-
- When this mode is selected the application will try to add all the data in the new file. If any item in the new upload matches an existing record the existing record will be replaced unless the previously uploaded data has been edited, or has additional related data that has been added since the upload.
Browse for the CSV file and then click SUBMIT.
Map upload file names to system file names if necessary
If the uploaded file field names do not match the default field names expected by the system a screen is presented for the user to map field names.
The incoming file field names are shown in the first column. The expected (Target) are shown in the next column. Simply select from the drop-down box the appropriate field to map to. When complete click SUBMIT to confirm the mapping.
Review the data upload and deal with any potential duplicate records
Once the mapped file is uploaded a screen is presented that displays the data to be uploaded.
The data table highlights any inconsistencies, duplicates or missing items. Amendments may be made by over typing the data.
When the user is content with the data click on SUBMIT to store the information.
Reversing a Donation Upload
Reversing a Donation upload can be done on an individual Donation basis. List the donations, EDIT the particular donation and in the maintenance screen DELETE the record.
The batch may also be deleted from the Batch Jobs menu. Using this option deletes all the uploaded records