Instant Trial Guide for Commercial Organisations
Introduction
Welcome to your trial of Liberty Accounts cloud accounting software for commercial and not-for-profit organisations.
Before looking at the features of the software we will start by providing some basic tips in the use of the software.
Cloud solution
As a cloud software solution Liberty Accounts is operated through standard internet browsers e.g. Chrome, Firefox, Edge and Safari.
Browser operation
As Liberty Accounts is operated through a browser then you can take advantage of browser quick keys rather than mouse clicks in certain situations.
Menu driven
Liberty Accounts is 'driven' through the use of the menus but also provides some quick action buttons. On the home page (the page you land on when logging in) these are accessed by clicking on the plus button on the right hand side of the invoice/bill ageing. So, for example, you can add an invoice through the menu option or the plus sign next to invoice ageing.
Less obvious menu items
On the extreme left and right you have two less obvious menus items (simply because they are not named). On the left you have 4 horizontal bars with options such as User Profile and the ability to add a new organisation. On the right you have the exit sign to close the file.
Visibility of menu options
Two things control what an individual user sees in their menu selection and those are:
- the options selected at organisational level; and
- the role (access level) defined for that user
Help menu item
Help is available in the menu and will return help for the page that you are on when clicking Help. If you want to navigate within the Help to another area you will find that the menu structure in the help follows that of the software.
Standard browser quick keys
Whilst there is no standardisation between browsers as a general rule the following is true:
- Chrome, Firefox and Edge will use [Ctrl] plus a letter
- Safari will use [Ctrl+Alt] [Cmd] or followed by a letter
e.g (F)ind would be [Ctrl]F or [Cmd]F. You can use the browser find function across the software but typically used where you might have a listing and you're looking for a specific value (number and/or text).
Other browser quick keys
On pages where you can add data such as invoices/bills/payments etc you will see ADD ITEM, UNDO ITEM, SAVE ITEM (and also SUBMIT). Again there is no standardisation between browsers but to (A)dd, (U)ndo and (S)ave then:
- Chrome and Edge - [Alt] and the bracketed letter
- Firefox - [Alt][Shift] and the bracketed letter
- Safari - [Ctrl][Alt] and the bracketed letter
The SUBMIT button
Use the SUBMIT button to confirm you have completed the entries on any given page. Any data entry page requires a SUBMIT for the data entered to be recorded on to the system i.e. SAVE ITEM will only save an individual line entry but this will not be recorded on the system unless you click SUBMIT.
Date for transaction entry
Where a date is required you can click on the calendar or manually enter the date.
When entering dates manually, a date guessing routine speeds up the input by taking the user input and assuming the missing month and or year based on the current date as the user leaves the field i.e. the date today is 30th October 2021
- User enters 15 or 15/ and tabs - field displays 15/10/2021
- User enters 15/9 or 15/9/ and tabs - field displays 15/9/2021
The Red +
On listings pages you will see a 'Red +' in the bottom right hand corner. The button provides quick add functions for the options that are relevant to the section you are reviewing e.g. a listing of bills and the red + would allow for adding a bill or payment. You can use these rather as an alternative to accessing through the menu.
This guide addresses the following topics.
- Tour of Liberty Accounts
- Beginning the Tour
- Paying an Outstanding Bill
- Receipt of Cash
- Bank Statement download and reconciliation
- Closing the VAT period
- Employee Expense Claim
- Payroll
- Running a Payroll
- Recording a Dividend
- Closing the Financial Year
- Profit & Loss and Balance Sheet reports
- Continue to try out features
Tour of Liberty Accounts
A basic appreciation of Liberty Accounts can be achieved if the following working tour is undertaken. Note that some screens may show different information depending on the organisation type, but the principles of the transaction remains the same.
You do not have to complete it all at one session but sign in and out as often as you desire and just pick up from where you left off. Remember you can use any suitably specified Internet connected PC from anywhere, there is no need to be at your usual PC.
Return to the list of topics in this user guideBeginning the tour
From the first screen (entitled 'Your Accounts on Liberty') select the newly created Trial Organisation by clicking on the OPEN button adjacent to the organisation details.
You are now working in the entity and on the Organisation Home Page where the left hand side shows open sales invoices plus cash flow graphs with the right hand section showing open bills. Underneath are key accounts that are typically monitored (these can be amended to your chosen accounts).
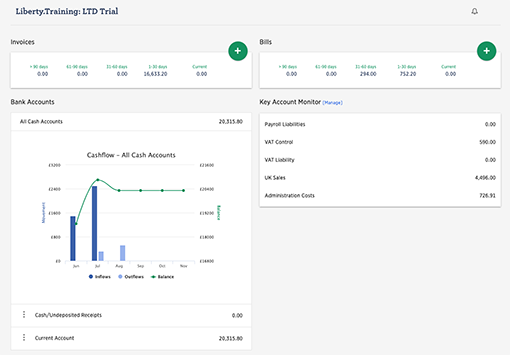
Note the symbol on the top right of the screen opens up a feature for adding, editing and reading notes.
Return to the list of topics in this user guidePaying an outstanding bill
Increasingly the secure bank transaction download is used to record payments, which we will cover later. Supplier bills are overdue by many days (30 or more) and needs to be paid immediately.
Use Pay Bills accessed via Expenditure menu.
Click on Office Products Ltd and the screen will present the bill(s) outstanding for that supplier.
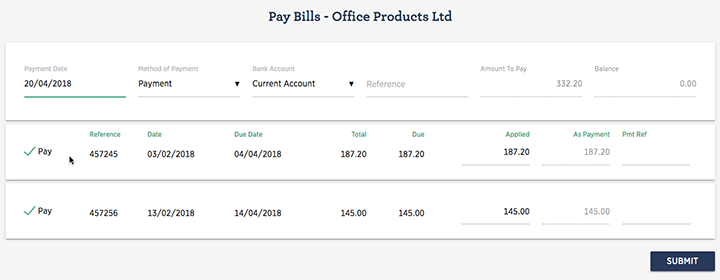
Accept the date (as today) and select the method of payment as Payment Select the Current Account in the bank account drop-down. A reference may be entered if required. Tick the box against the two bills being paid (in this case for a total of £332.20). Click on SUBMIT to record the payment.
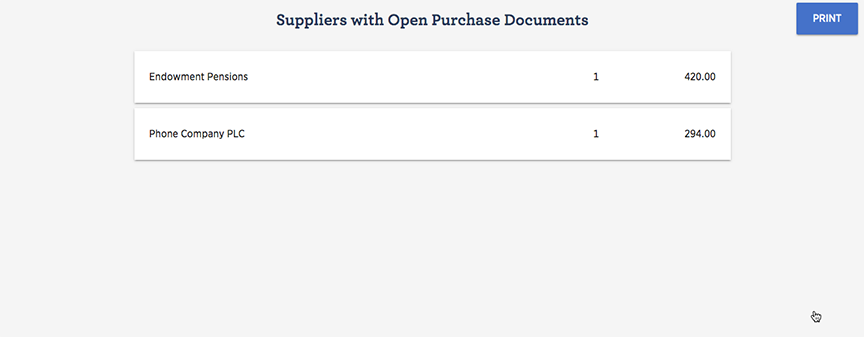
The screen returns to the list of suppliers with outstanding bills. A blue PRINT button is briefly visible on the top right of the screen this produces a printable remittance advice.
Note the remittance advice may also be printed from the lists of payments.
Expenditure - Payments & Transfers - from Action BOX adjacent to the relevant payment - Open - Print
To see the impact, go to Expenditure menu and select Bills/Credits Notes. Enter a From Date four months earlier and Status is ALL or CLOSED. The bill is now shown as paid and the transaction locked. On the Home Page the Unpaid Bills Aged Summary section has now been updated.
Note clicking on the network symbol will open up a dialogue showing the details of the payment allocation. The payment may be de-allocated if desired and subsequently re-allocated or deleted.
Return to the list of topics in this user guideReceipt of cash
Increasingly the secure bank transaction download is used to record receipts, which we will cover later.
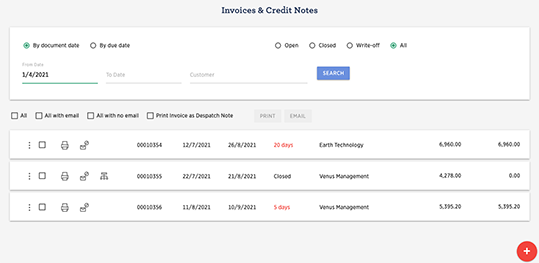
A customer has just paid the final amount to settle an invoice. The customer is Venus Management Ltd and an amount of £278.00 has been received with the remittance advice from invoice number 00010355.
Use Receive Payments accessed via Income menu.
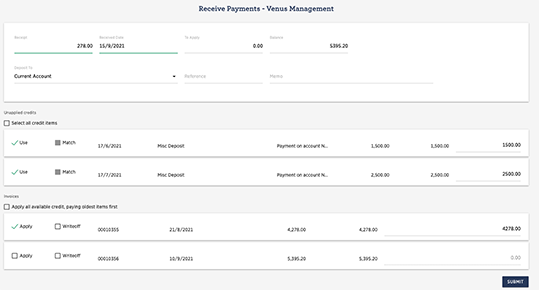
Accept the date (as today) Select the current account from the deposit to drop-down. Add a reference note (if required) and enter the Receipt of £278.00.
Two previous part payments have been received but not yet allocated to the invoice so tick the "Use" boxes against those receipts; and then tick "Apply" box by the invoice. Click on SUBMIT to record the receipt and allocate those amounts in settlement of the invoice.
To see the impact, go to Income menu and select Invoices and Credit Notes. Enter a From date fours months in history and click the "All" button and SEARCH. The status of the Venus Management Ltd Invoice is shown as closed and the transaction locked. On the Home Page the Open Invoice Aged Summary section has now been updated.
Likewise select Receipts and Deposits from the Income menu, details of the received payment are displayed.
Included on the  action box is a VOID action.
Only use this in the event that the payment is dishonoured,
the system will show the receipt as well as the reversal in the bank account (matching the bank statement entries)
and will also restore the receivable item.
action box is a VOID action.
Only use this in the event that the payment is dishonoured,
the system will show the receipt as well as the reversal in the bank account (matching the bank statement entries)
and will also restore the receivable item.
Note clicking on the network symbol will open up a dialogue showing the details of the receipt allocation. The receipt may be de-allocated if desired and subsequently re-allocated or deleted.
Return to the list of topics in this user guideBank Transaction Download and Reconciliation
We have downloaded, through Liberty Accounts secure bank download (no banking credentials are stored in the database) the latest bank transactions and now wish to analyse them.
Navigate to Bank Import from the Bank menu, hover the cursor over the relevant bank to open a sub-menu.
Bank - Current Account - Process Import
The imported bank transactions are displayed.
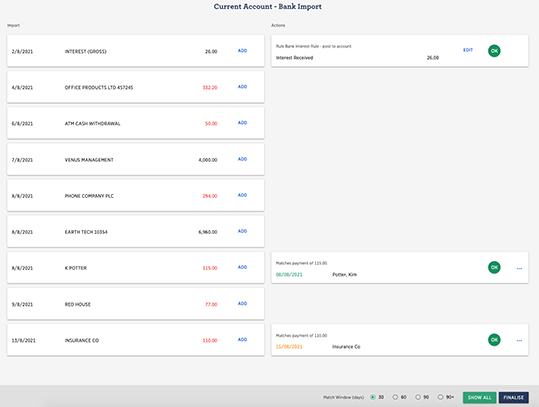
The system identifies possible matches to previously entered transactions and also applies rules when they have been set. The following is a guide to processing imported bank statements.
Bank Statement Import
The screen is used to process imported bank statement items.
Processing an uploaded statement
The statement item list consists of two columns. The left hand column displays all the items that are on the bank statement. The right hand column shows possible matches that the system has found and offers a description of what that may mean. Where nothing is shown on the right hand column adjacent to an item, the system has no suggestions.
Match Window(days)
Initially when a statement is imported the system uses the default window of 30 days from the date associated with the imported transaction (the date given by the bank) to look for a match. In most cases this window will be sufficient and is the most efficient in processing terms.
However there may well be transactions (often cheques)that are presented to the bank outside of this 30 day window in which case the system will not present a match. A user can therefore chose to extend globally the match window by either :-
- 60 days
- 90 days
- 90+ days
Where an organisation has a significant number of transactions extending the global window can potentially extend processing time.
Note where more than one matching transaction may exist click on the blue … symbol to pick from a list and if required extend the match window days to suit for this transaction.
Automated processing of rules
When the system can determine that the application of a rule for a particular transaction is Unambiguous the item is automatically processed as reconciled and does not appear in the list.
By automatically applying the rules there will be fewer key strokes required by the user when completing the import i.e. you won't have to click OK to confirm the application of each rule. You can review what has been applied by clicking 'Show All' at the bottom of the page and, if you see something that you want to be recorded different then you can UNDO the application. All auto-applied rules are shown in a salmon colour.
It remains the case that nothing is recorded on to the system until you FINALISE the import.
Where there is any possible conflict or a user decision that has to be made then the rule won't be auto-applied. Possible cases are as follows:
- the rule is to apply a payment against a supplier bill
- the rule is to apply a receipt against a customer invoice
- a system transaction is identified that may be a manual entry for the intended rule i.e. to avoid possible duplication more than one rule applies to the imported transaction
Where a user decision is required the user will be required to click on the
action box symbol
to make their selection.
For any other transaction where there is no rule in place the the standard procedure of adding as a new transaction or matching to a manually entered transaction still applies.
This will speed up processing for the situation where there are many rules in place.
Processing statement items
Where items are automatically processed as above, they are not listed in the screen.
When an item has been processed it disappears from the screen. Note to show all items that have been dealt with toggle the SHOW ALL button at the base of the page.
For those items where there is nothing in the right hand column the user will create the transaction (as the system does not already have it). The process of creating the transaction will also reconcile the item. Click the blue ADD symbol and the Add Transaction screen is presented, see below.
Where an item is matched to a transaction that has been already posted and reconciled, the right hand column displays the shield and tick icon for reconciled. If the user is certain that is the case click the green OK button to confirm. However as it is more likely to be a different item but with the same value, inspect the date and click ADD as an item to reconcile.
Where an item is matched to a transaction that has already been posted but not yet reconciled, the right hand column displays the green OK button. Click it to reconcile and confirm.
Where a processing rule exists the right hand column identifies the rule and describes the impact. To accept the processing of the rule click the green OK button. Where more than one matching transaction may exist click on the blue … symbol to pick from a list, if none apply then green OK button.
Note where the imported value could be allocated to outstanding documents such as invoices or bills. a list of documents is presented when the green OK button is clicked. If the user would prefer to not allocated to documents then click ADD, in the left hand column to enter a specific transaction.
Add Transaction
Select the Document Type if one is not being displayed. Many import file formats will contain the document type.
Select a counterparty from the drop-down lists If necessary a new customer or supplier can be created at this point. Simply click ADD and complete the dialogue making sure you correctly create a customer or supplier as needed.
For a purchase (payment) transaction a Reverse Charge VAT tick the box will be visible. Tick this if the transaction is subject to reverse charge. See the VAT user guides and consult with your professional advisor is you are unsure as the meaning.
Select an Account; if learned account codes are associated with the counterparty then the Accounts box will be pre-populated with the default. The user can amend the selection. A user can also create a new account by clicking Create Account.
If additional Line items are required to analyse the statement item over a number of accounts click the green + symbol to open up a new line. The total of the item amount may be allocated as absolute amounts or as a percentage by toggling the £|% symbols.
If appropriate the VAT Rate displays the default rate associated with the account. The user may amend as required; and the finally displayed rate will be used in any necessary computations.
Enter any analysis is needed, Branches or Employee for P11D Purposes in the fields shown.
To complete the processing of the item click SUBMIT. The details of the transaction will be posted and when all items in statement batch have been processed and the Finalise Import button clicked the item will be marked as reconciled.
Related Topics
Return to the list of topics in this user guideEmployee Expense Claim
An employee expense claim (or a mileage claim where the employee is using their private vehicle for a business specific journey) can be recorded as a repayment to the employee either directly as a bank transfer, or if the employee is a director via the Directors current account or included with the net pay via a payroll run. A hard copy of the expense or mileage claim is available to be distributed (or signed off) to the employee. Expense and mileage claim are accessed via the Expenditure menu.
Expenditure - Add Expense Claim (or Add Mileage Claim)
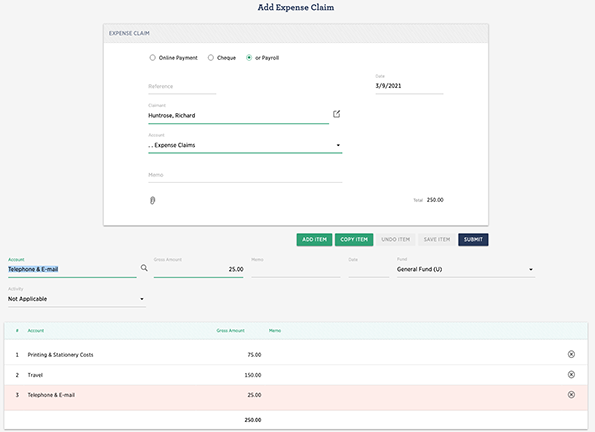
Select the method of reimbursement, in this case Director Current Account/or Payroll. In the A/C field select the Expense Claims from the drop-down list to make the reimbursement via a payroll run. Select the Claimant. Enter a reference if required and amend or leave the default date. Click ADD ITEM; Select Printing and Stationery Costs from the Account drop-down.
Account
The account drop down list is used to associate the line item of a transaction with an account from the chart of accounts.
- If nothing is displayed either
- simply start typing an account name or ledger code and the system will provide a list of potential selections; choose the required account by clicking on it.
- or click the icon
- to display a list of document-type sensitive account possibilities. Note to change to other account-type options click the small down arrow at the base of the screen
- If an account is displayed
- In many instances once a counterparty (customer, supplier or employee etc) has been selected
the account box will display a default learned account. For other associated learned accounts
click the icon.
Note to change to other account-type options click the small down arrow at the base of the screen
The Gross Amount as £75.00. SAVE ITEM to confirm the line item and add additional lines. Click SUBMIT to record the transaction.
The expense claim can now be reimbursed in the next payroll run as an additional amount to the net pay. See below.
Return to the list of topics in this user guidePayroll
The system has a fully integrated payroll. The following is a very brief overview of it use. The current income tax year has been pre-set, and can be inspected by navigating to the Payroll menu.
Payroll - Configure Payroll - PAYE Settings
Some pay elements have also been set up in readiness to create a payroll. The pay elements are:-
- Staff Pay
- Expenses Claimed
- Director Pay
These may be inspected, amended or added to (for say an Overtime element) by navigating to
Payroll - Configure Payroll - Payroll Elements
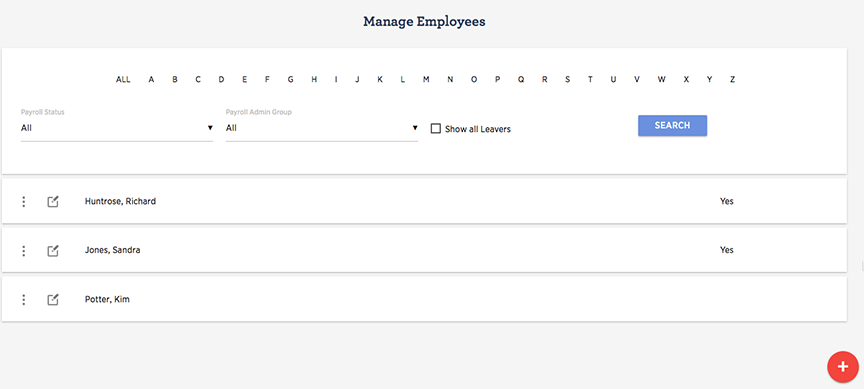
Details of tax codes, employment dates and rates of pay for each employee have also been pre-set but can be reviewed and changed if required by going to the Manage Employee menu.
Personnel - Manage Employee
A screen is presented that lists all employees and by clicking the action box
offers access to their Employment details, the Tax & PAYE data, their Pay, Deductions and Pension details.
Note: - When running regular payrolls pay data can be amended in a Quick Pay/Deductions screen and
does not require a user to edit each employee individually.
 Return to the list of topics in this user guide
Running a Payroll
As all the necessary information has been pre-set, simply go to the Payruns menu and run the payroll.
Payroll - Payruns
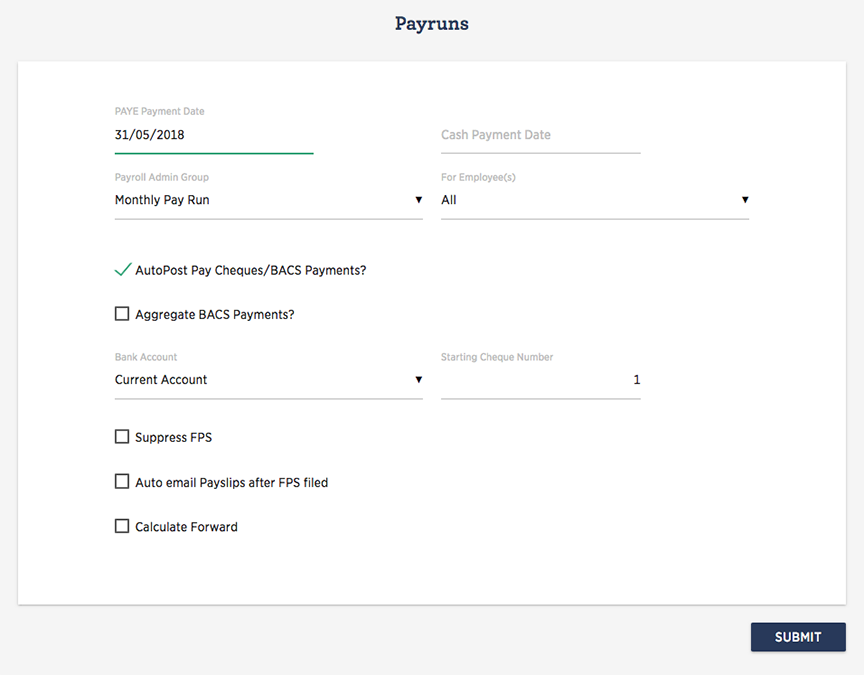
Select PAYE Payment Date. Click SUBMIT. The Payrun is now displayed in the redrawn screen.
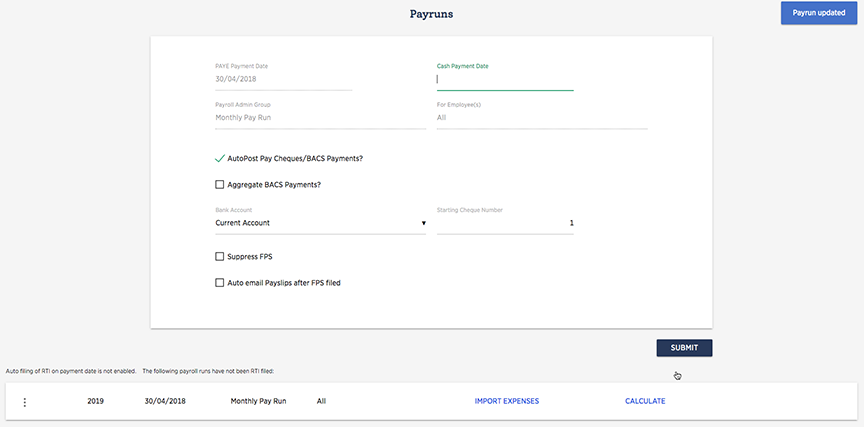
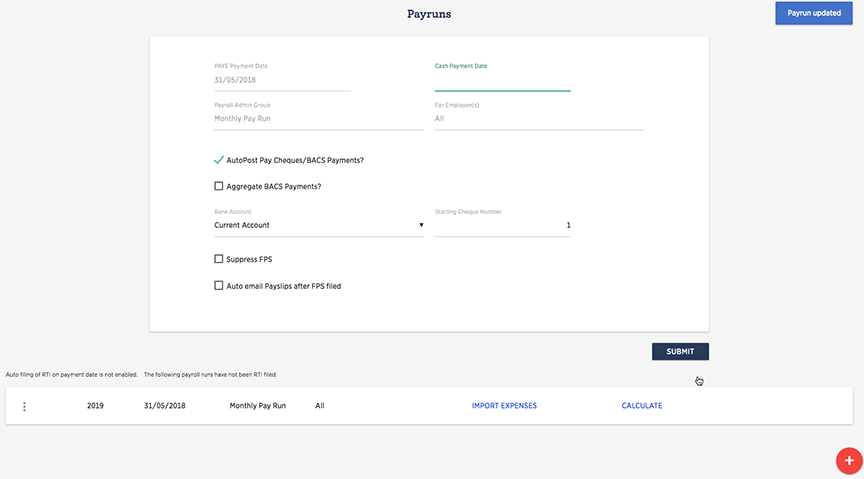
Now import the expense claim by clicking IMPORT EXPENSES and click Add to Pay the particular claim. Click SUBMIT.
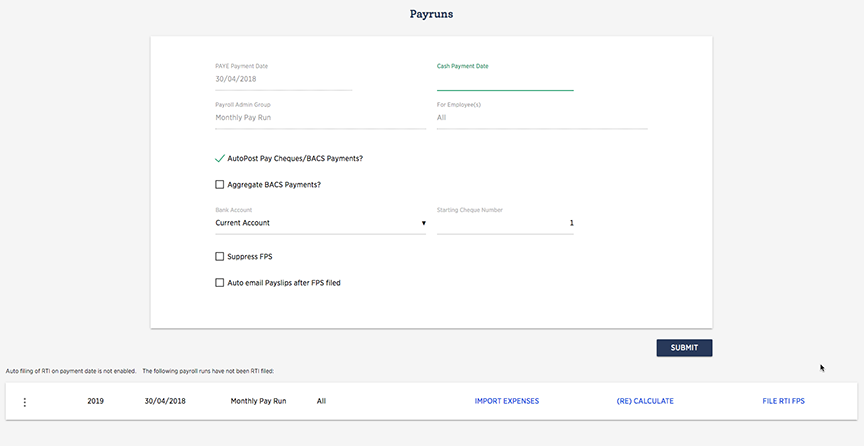
CALCULATE the payroll and the screen redraws again with the status updated and the FPS ready to file and close the payroll.
Navigate to reports for payslip and payroll run summary
Payroll - Reports - Payslips or Payroll Run Summary etc.
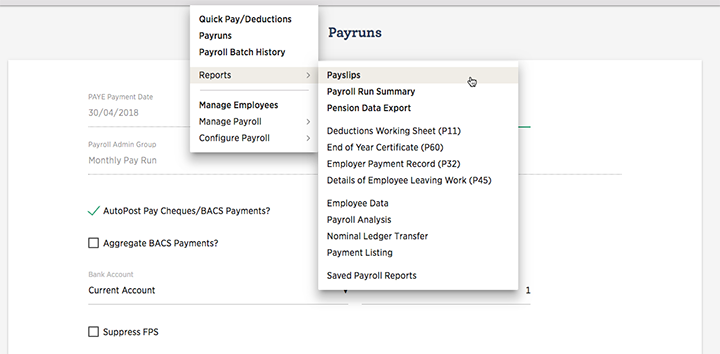
Have a look at the reports available including payslips, payroll run summary and P11 deductions work sheet.
Note further information of payroll and payroll processing is available from Payroll Overview
Return to the list of topics in this user guideClosing the Financial Year
The financial year ended on the last day of the month two months before the date of the creation of the trial organisation, e.g. if created on 5th April 2018 then the year ended on the 31st Jan. 2018. Whilst the New Year is available to record transactions entries for the old year can still be adjusted until closed after which no further changes are possible.
The year-end routine is accessed via the Control menu.
Control - Batch Jobs - Close Financial Year
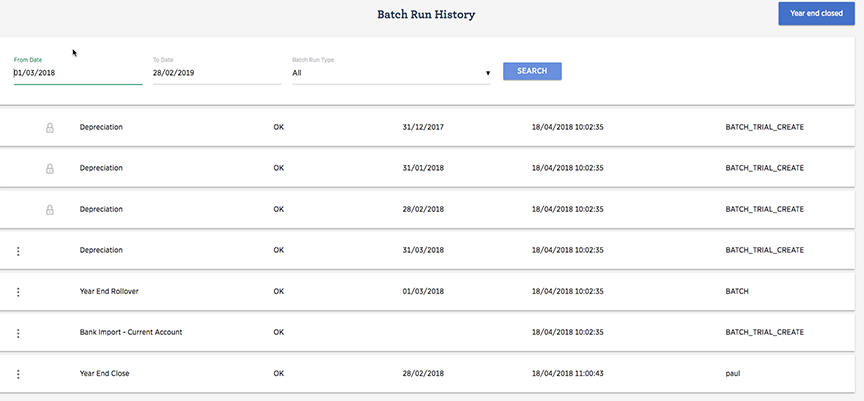
A drop down box offers the year that is to be closed (pending year). Select this year and click on SUBMIT to continue. A warning is displayed; click OK to complete the routine. The system confirms with a message at the top of the screen and a batch run summary screen is displayed.
Items that were recorded in the closed year are now frozen, the status indicated by a padlock symbol. If an attempt is made to enter a transaction into a closed year, the system will prevent it. Staff with the appropriate access level will be able to enter a Journal to a closed year.
Return to the list of topics in this user guideContinue to try out features
Liberty Accounts offer a range of fully integrated features such as Bank Statement download, P11D Benefits and Expenses (with online filing through the Government Gateway for RTI payroll submissions and P11D?s).
To explore some of our other features that are not currently activated in the trial company then go to
Control - Organisation Profile - Optional Features
Tick the optional feature(s) you wish to explore and click SUBMIT.
Liberty Accounts recommend that you try out as many things as possible. The organisation is trial and is made available to experiment with without restriction. Help exists for all pages, click on the Help menu.
Don't forget that you can see and use your accounts from any suitably specified internet connected PC from any where, there is no need to be at your usual PC. Also remember two or more persons can be using your accounts from different PC's at the same time, so reviews of data and results with, say your clients or advisor, can be efficiently and readily completed.
Return to the list of topics in this user guide