Paypal Integration
A verified business PayPal account with sterling only balances may be linked to Liberty Accounts so that all cash transactions through the PayPal account can be directly downloaded into the system. The process will create the transactions in Liberty Accounts and reconcile them. Note: The system does not and will not store any Passwords for PayPal accounts. Therefore a password will need to be entered each time data is downloaded.
Note PayPal
Pay Now Integration may be implemented at the same time as download integration. See the guide below.
The Paypal Integration process in summary.
- Modify the PayPal Account profile to give permission for the use of the Liberty Accounts API.
- Set up the PayPal Account in the Liberty Accounts and verify it with PayPal.
This guide addresses the following topics.
- Modify the PayPal Business Account
- Set up a PayPal Account on the system
- Importing PayPal Transactions
- Processing Imported Deposits
- Processing Imported Payments
- Finalising an Import
- Import date range and PayPal transaction ID
Modify the PayPal Business Account
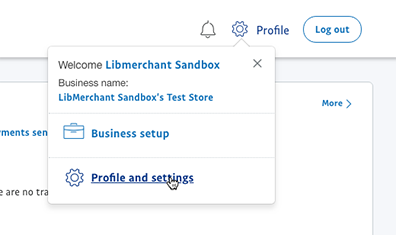
It is only PayPal business accounts that can be integrated with the system. Log on to the relevant PayPal account and click Profile on the top right of the screen then on the sub-menu click Profile and Settings
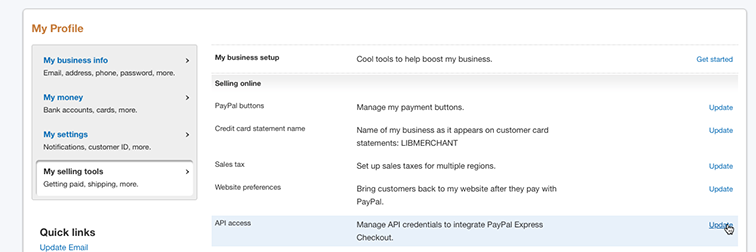
On the left hand side select "My Selling Tools" and then click
Update adjacent to API Access.
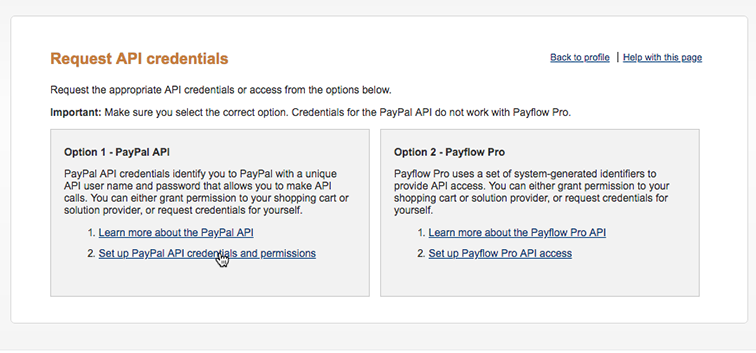
In the Request API credentials box, go to Option 1 and click on 2. Set up PayPal API credentials and permissions.
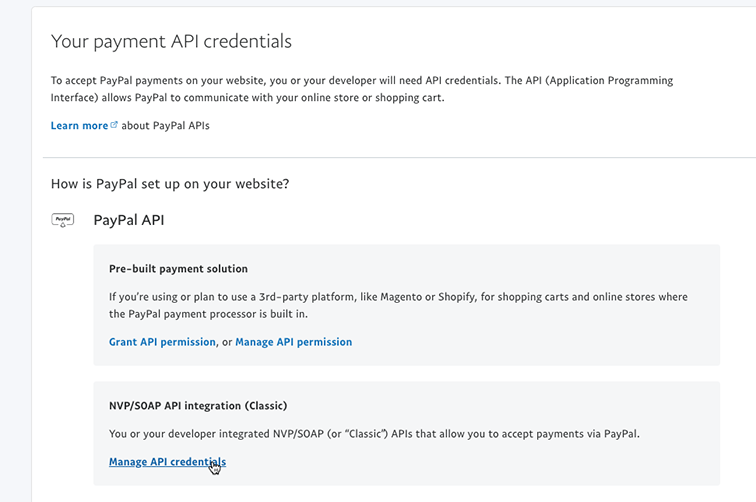
In the "Your payment API credentials screen" click Grant API permission under the Pre-built payment solution section, not the NVP/SOAP API integration (Classic) section.
A screen entitled Add New Third Party Permissions is presented and in the box 'Third Party Permission Username' enter the following. paypal_api1.libertyaccounts.com
Now click 'Lookup' and a list of available permissions is presented.
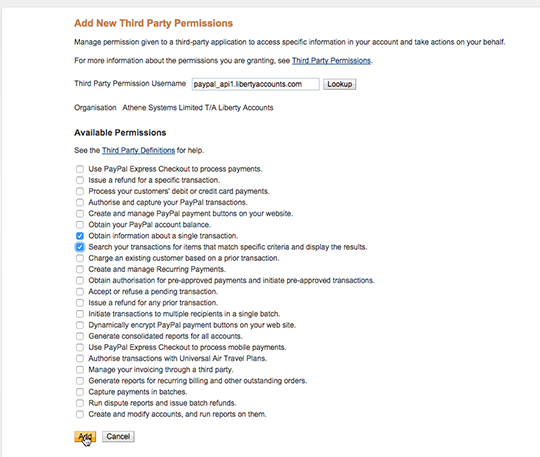
Tick only the two permissions indicated in the screen shot, namely: -
- Obtain information about a single transaction
- Search your transactions for items that match specific criteria and display the results
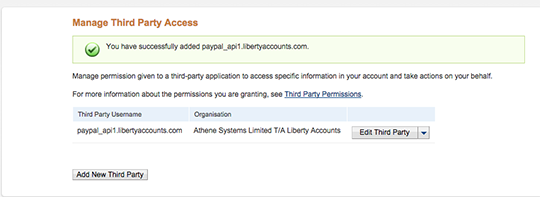
Complete by clicking the Add button. A confirmation message is then shown.
Although the permissions are now activated it will be necessary to get details of the API signature for embedding in Liberty Accounts to authorise data downloading. Return to API Access screen from Profile and Business Set-up Click on 'Request API credentials' and then in the following screen, select 'Request API signature' and confirm by clicking the 'Agree and Submit' button
The view or Remove API Signature screen is displayed.
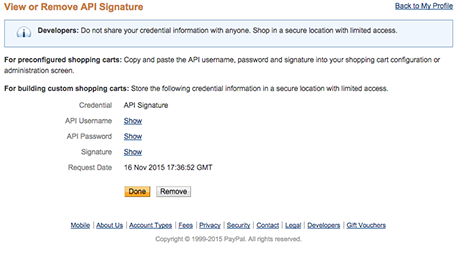
Click on 'Show' to reveal details of:
- API Username
- API Password
- API Signature
Make a careful note of the details. It may be appropriate for accuracy to use a copy and paste process as these pieces of information will need now to be entered into the PayPal account on Liberty Accounts.
Set up a PayPal Account on the System
Now log on to Liberty Accounts and the entity for which the PayPal account is to be set up. Navigate to the Accounts menu and Add Custom Account.
Accounts - Add Custom Account
The usual account maintenance screen is presented. The user will need the following information: -
- API Username
- API Password
- API Signature, perhaps stored as a copy to be able to paste
- Opening balance amount and opening balance date
Enter an appropriate Account Name and select "Current Assets - Bank Account" as the Account Type and tick the PayPal box. Some additional fields are then presented. Enter details of the Opening Balance and Opening Balance Date. It is important to note that downloading data can commence from this date but not prior.
On the PayPal Integration Details Tab, tick Enable payPal Import and enter, by pasting or typing, the API User Name and API Signature, tab out and the Validate button will be visible. Click VALIDATE and a confirmation screen requesting the API password is displayed. Enter the password and click VALIDATE again.
Successful validation is confirmed at the top of the redrawn screen.
If VAT applies standard VAT is calculated and may be amended manually as required.
Select a PayPal Income Account as a default for posting receipts. Note a user may create the account within the dropdown selection. Likewise select a default Bank Accounts for cash To or From and finally a PayPal Expenses Account. To complete the account set up click SUBMIT.
To select an account simply start typing an account name or, if activated, ledger codeledger code
and the system will provide
a list of potential selections; choose the required account by clicking on it.
Alternatively click the  icon to display a list and click on the account required.
Note to change to other account-type options click the small down arrow at the base of the screen
icon to display a list and click on the account required.
Note to change to other account-type options click the small down arrow at the base of the screen
At this stage it is recommended that if an opening balance has been entered a manual reconciliation be performed.
Accounts - PayPal Account - Reconcile
The reconciliation screen lists all the un-reconciled transactions recorded in the paypal account. All previously reconciled transactions are still visible in the normal view of bank account, but as they are already reconciled they do not need to be shown again in the reconciliation screen. The completion of a reconciliation process creates a batch report that is available to view and if necessary delete to start again.
Key Features of the screen are: -
- SAVE WORK button
- When visible, saves the current status of the page. The user may then leave the page or log-out. When they return the situation on the page is restored.
- SUBMIT button
- completes the reconciliation of this batch and creates a batch record. The button will only be visible where they are reconciled items and the Unreconciled balance is zero.
- RESYNCH button
- reloads the reconciliation state as currently stored on the remote data base servers.
- PROVISIONAL SELECTION BY DATE
- see below in the Reconciling your Account section.
- EDIT button
- opens the particular transaction for amendment. When completed the user is returned to the reconciliation screen. The screen status will remain exactly the same except for any amended value.
- Reconciled From
- is the date of the last reconciliation. The date will either have been entered by the user in a manual process or taken as the date of the newest item from a statement upload process. It can be overwritten if necessary, for example if a previous reconciliation batch is deleted and needs to be re-reconciled out of sequence.
- Reconciled To
- is the date of the bank statement that is now being reconciled. This may be used in conjunction with the Provisional Selection by Date button (see above).
- Starting Balance
- is the closing balance of the last reconciled bank statement
- Ending Balance
- is the closing balance on the bank statement now being reconciled.
- Payments/Deposits reconciled
- are the running totals in each category as they are marked as reconciled
- Amount to Reconcile
- is the residual amount still to be reconciled. It is the difference between the Ending and Starting Balances plus the Payments reconciled less the Deposits reconciled. A reconciliation process CANNOT be completed until this is zero.
The remaining section of the screen outlines the details of the un-reconciled transactions as recorded, making it clear as to whether they are payments or deposits. The final column is where an item can be marked as reconciled. Simply click on the box. A check mark will appear. Clicking on it again removes the check mark. If you wish to remove a number of check marks simply click on at the top of the column.
Importing Paypal Transactions
PayPal import may be initiated from one of two points via the Accounts menu.
Accounts - Relevant Paypal Account
Hover the cursor over the relevant paypal account and from the sub-menu click the PayPal Import command.
Accounts - Bank/Credit Accounts - Action Box - Statement Import
The PayPal Import screen is presented.
To and From Dates for the import period are displayed, these may be amended, as well as mandatory entry of relevant PayPal API User name and PayPal API Signature. Enter the PayPal API Password. The default Import method, Individual or Aggregate, is selected, but may be amended if required. The default VAT import mode is selected; this too may be amended if desired. SUBMIT to start an import.
A two-page screen is presented. The first displays Deposits and includes sales and sales refund transactions and amounts transferred into the PayPal account. The second Payments, includes payments, payment refunds and transfers out of the PayPal account.
Processing Imported Deposits
What is displayed on the Deposits page is dependant upon the import mode adopted. If, as in first the example below, aggregate sales items were chosen, then each item is summed into the total presented.
Note the BREAKDOWN button that displays the individual items making the aggregate total.
If the import mode is set to individual, each item is presented in the screen.
In either case the default position for Sales and Fees is that the item will be posted as an income to the account shown (It can be amended if necessary) with associated VAT and Fees.
For the VAT import mode Obtain from PayPal (Where available) the system will display the VAT values imported from PayPal. Where the VAT amount is close to a particular VAT rate ,20% or 5%, that will be displayed. Where the VAT amount from PayPal is zero or blank the rate displayed is 'None' otherwise the system will display 'Average'.
Note for either of the VAT import modes the VAT rate and/or VAT amount may be amended manually.
In the case of individual items being imported then any particular sale item may be matched to an existing sales invoice. Click the Invoice button and select the relevant customer from the drop-down.
Note that only customers that have outstanding sales invoices are displayed.
A list of outstanding sales invoices for the selected customer is displayed. Click the invoice(s) to which the receipts are being allocated. If an overpayment is applied then any balance is posted to the customer ledger as a Receipt for future allocation. A warning message is displayed and dismissed as necessary.
Finally click SUBMIT to confirm and return to the deposits screen.
When all deposits processing is complete click the PAYMENTS button to move to the second screen. Note the user may move between the deposits and payments screens as required.
Processing Imported Payments
Each individual item is presented on the screen in a similar way to deposits and processing is completed in the same way. The default position is that the item will be posted as an expense to the account shown, It can be amended if necessary, with associated VAT.
For the VAT import mode "Obtain from PayPal" (Where available) the system will display the VAT values imported from PayPal. Where the VAT amount is close to a particular VAT rate (20% or 5%) that will be displayed. Where the VAT amount from PayPal is zero or blank the rate displayed is 'None' otherwise the system will display 'Average'.
Note for either VAT import mode the VAT rate and/or VAT amount may be amended manually.
In the case of individual items being imported then any particular purchase item may be matched to an existing supplier bill. Click the Bill button and select the relevant supplier from the drop-down and proceed as described for invoices above.
Finalising an Import
When ready, click FINALISE. Each transaction is posted and reconciled. The Reconciliation History screen is presented from which a report detailing the imported batch is available for printing.
Note deleting the batch, sets the items to un-reconciled but does not delete them from the system, they remain posted to the PayPal account to be edited or deleted item-by-item as appropriate.
To return to this screen, hover the cursor over the relevant PayPal account and from the sub-menu click the Reconciliation History command.
Import date range and PayPal transaction ID
No item may be imported with a date earlier than the opening balance date set when the PayPal account was created in the system. See Set up a PayPal Account in the System section above.
Once an item has been imported the system stores its related PayPal Transaction ID and as long as that transaction has not been deleted from the system it cannot be re-imported again.